Sunday, October 2, 2011

Ultros (FF6) and Spikey-eared Pichu (Pokemon)

Sorry for the hiatus! Now that school has started, all of my crafts have come to a complete standstill... =(

Until recently! (dun dun dunnnnn)

I celebrated getting over my first midterm with a few Perler and clay adventures. And bubbletea, but that's a completely different story. I'll talk about the clay creations later once I finish them up. They still need to be glazed and prettified. <3

As for the Perlers, I whipped up a sprite of Ultros, one of the antagonists from Final Fantasy 6:
He's making his own, tentically ":3" face... <=D
I know I've mentioned my love for this game before (it is my absolute favourite!) and now I'm going to expand on that elaboration. The antagonists in this game were spot-on. One of the reasons this game was so damn enjoyable was because the bad guys was a funny octopus dude (Ultros) who doubled as a receptionist on his down time and a crazy-assed psycho (Kefka). Their appearances, as well as some of the other antagonists that make cameos, make the game so easy and enjoyable to play. I'm so thankful that the creators did an amazing job with the plot and the antagonists in this game...

Buuuut I digress. ^^;

The other sprite I made was one of the adorable Spikey-eared Pichu that you can catch in the Pokemon games:
This project only confirmed a couple of things for me:
  1. I need more shades of yellow. As it is, this is a shiny Pichu. A Pichu with the spikey ear can only be caught in an event. She's rare enough... and I just added another element to the mix. ;______;
  2. I need more shades of grey. The ears and tail do look okay, but I think with a shade of grey just in between the black and the one I have now, it would be perfect. 
I think he's cute, and he's on my mantle with his buddies Articuno and Thor (a plushie I bought my boyfriend).  I really miss doing my crafts, that's for sure... I hope I can have some time to do them on my weekends. I left my job (I used to work at a restaurant) where I would work on Sunday and Tuesday evenings, so I have time freed up. Unfortunately for me, I filled up some of that time with work at school in the form of tutoring and notetaking for people with disabilities. They're the most rewarding jobs ever, by the way.

Oh, and then I study. A lot... @.@

Anyway... I'll keep you posted on the clay figures. I also made another keychain for a friend (Victini from Pokemon!), so stay tuned! :3

Thursday, September 1, 2011

My direction + Vaporeon and Flareon figures

I did a lot of thinking about the direction I wanted to go with my figures and charms. After Slinky Dog got so much attention and admiration, the answer hit me like a ton of bricks. I'm usually very particular about detail. I'm also a perfectionist (being a Virgo and all). So with my next work, I decided to incorporate my new answer.

Quality > quantity.

I want to ensure that people get a unique, one of a kind product from me. I want to make sure that it has my flare, that people will someday know it's something I created just by looking at it.

So I gave it a shot with making Vaporeon from Pokemon:
I added extra detail in the tail, ruffles around his neck, and spine. I think he turned out exceptionally well and I'm very proud of him!

He took about 3 hours in total to create.

Then I got the idea to try to do all of the Eevee evolutions from Pokemon. I tried my hand at Flareon next:
To be honest, Flareon was probably one of the hardest figures I've sculpted to date. In total, he took about 6 hours to create. His legs gave me the most trouble. I also had troubles figuring out how to do the fire. I knew I wanted to use liquid clay to create a firey texture, but to my disappointment, I couldn't find liquid clay anywhere. So I was forced to make my own... which was tricky and very time consuming. As well, my intentions with the fire around his neck, on his head, and at his tail, was to be transparent. I had worked in regular clay with transparent clay but unfortunately after he was baked, the fire wasn't transparent.A real disappointment on my part, considering I worked so hard with the fire parts.

Oh well... it's a learning experience for sure! All I know is that I would love to remake Flareon the way I had pictured him from the beginning. I intend to do so once I get a little more experience under my belt.

Sunday, August 28, 2011

More charms, magnets, and a hair clip!

I'm a busy bee on my days off, as I'm sure some of you can tell. 

Before my trip to British Columbia, I had made these charms for myself:
Sailor Mercury
Terra (FF6/Dissidia)
As well, I made some more charms before work one day:
Finished up Wolverine with some paint and glaze.
Happy pop tarts! <3 Blueberry, S'mores, and Wild Berry!
NES controller.
Pedo bear.
I had a lot of requests for more Zelda charms (everybody loves the triforce), so after making so many triforces, I made a little Link charm:
...And out of personal interest, I made myself a Yoshi... because everyone loves Yoshi, right?!
I also turned some of my Perler creations into magnets...
And made a new creation and turned it into a hair clip!
Inspired by the recent loss of a friend I went to high school with, I also made this charm: a mended heart:

Busy bee, I tell you... And now it's time to work for the weekend. =(

Saturday, August 27, 2011

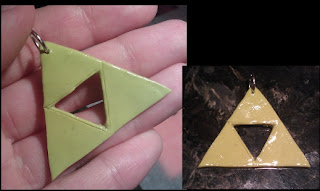
Commission: Triforce and Treble Clef charms

I recently reinstated my facebook account in an attempt to attract an audience with my artwork and jewelry. One of my cousins flatters me too much and sent my link around, which caught the attention of one of her friends. She asked for a Triforce charm done smaller than the perler version as well as a Treble Clef charm.

So off to work I go!


For the Triforce charm, I mixed in a little bit of Mona Lisa metallic dust to the yellow to add some shimmer in the sunlight. It felt like I worked at Marble Slab/Coldstone Creamery, which is always fun. <3

With the Treble Clef, I dusted some of the metallic shimmer on top of the charm before I baked it. You can see how it shines in just the regular light.

I think the treble clef was the most fun to do. Who knew!? And I think the finished result of both charms is pretty awesome. =)

My facebook fan page can be found here: Charm 'N Geekery

I do custom models and charms. Interested? E-mail me at krista.lynn.macpherson@gmail.com for inquiries.

Friday, August 26, 2011

Commission: Slinky Dog from Toy Story

As I mentioned before, my friend Marcie bought me a 3 month premium membership to Deviant Art and I intended to pay her back. I asked what she would like me to make her, and she listed 3 characters from Toy Story: Slinky Dog, Three Peas in a Pod, and the Dinosaur. I chose the hardest of the three, in my opinion: Slinky Dog.

Why? Because I love challenges, which this commission certainly gave me, but in the end, it all worked out!

I started by making the various parts of Slinky Dog:
...And I started to piece him all together.

Now what Disney/Pixar doesn't tell a person is that the weight distribution of their characters might not be all that accurate (probably because nobody really cares, unless they're OCD or making a model replica like I was)... thus why the front of Slinky Dog looks so... blah. He kept falling over when I put him all together, so I had to fiddle around with the legs, which created lame stumpy legs in the front.

After that, I baked the little guy for about an hour. Unfortunately, I didn't take pictures of me baking him... I was too scared of what might happen in the oven. =(

After his sauna sans steam treatment, I painted on his eyes and eyebrows and gave Slinky Dog a little glaze. Here's the finished product:
 
 
The total time it took was about 4 hours. I don't think that's so bad considering all the rocky bits I had. =D

And now Slinky Dog is en route to my friend. I padded the hell out of his package... x.x
What would you like to see next? 
I do custom models for commission. Interested? Contact me: krista.lynn.macpherson@gmail.com

Sunday, August 21, 2011

Freshwater Shell and Pearl Necklace/Earring set


I've been looking at these shells for a while now, wanting to make something out of them. I've been holding off until I got around to buying copper links. I finally got around to buying those and constructing the necklace, only to realize I then needed copper headpins. Oops!

So this baby has been a work in progress for a couple of days. I finally finished it the other day. =)

It fits loosely around a neck, allowing for a diversity of necks to wear the necklace. Because they are shells, the necklace is also very light.


I also included accent beads in both the necklace and earrings. There are turquoise-coloured oval beads lined with copper at the center of each earring and the necklace.
 

All in all, it's a very nautical styled piece. I was inspired bymy childhood (and adulthood) of finding shells on the river in Drumheller!

Enjoy!

Saturday, August 20, 2011

Charming

You would think by the way I switch mediums around like the plague that I become obsessed too easily...

...Annnd maybe that's true.

Lately, I've been making charms of random video game characters. Sooo many charms. Let's start first with Marvel vs Capcom 3 characters:

Spiderman, of course. Marvel
Thor. Marvel.
Tron Bonne. Capcom.

HULK. <3 Marvel.
Megaman. Capcom.
Ryu from Street Fighter. Capcom.
I also made a full figure one of, in my opinion, the best coupling in Pokemon: Pikachu and a ketchup bottle:

I'm impressed at how cute it turned out! I also have a couple others waiting on a glaze for when I get home (I'm currently out of town).

These all have little eye hooks in them to hang them from various things, like the gym badges do. I also remade some of the gym badges after a critique I received on my DA page, saying that I should focus on line work.

I finally bought glaze to put over these charms. I'm using DecoArt's Triple Thick Brush-On Gloss Glaze, which works great! But I'm beginning to wonder if I need a special brush for it... I'm just using one of my watercolour painting brushes (Oh, and go figure, as soon as I find a link to the product information, I also find that I should be using an acrylic brush. Oops!). 

Speaking of which... I took a look in my art supplies box that I packed when we first moved into our condo in April of last year and scored large on supplies I forgot I had! Anyone who has had to buy acrylic paints knows that they are hella expensive, but I managed to find the main colours I would need: black, white, yellow, brown, and blue. I guess I could also use a red, but for now I'm not worrying about it.

I have a cheaper solution in mind for paint jobs, however I need to discuss it with a hobbyist at a hobby shop.

As for everything else, I have ideas as to what I want to do with my Perler's, though I have to wait for a shipment of specific colours to come in. I tell you, it's gunna be Christmas in August in a week. I'm getting that shipment, a shipment for beads, and a shipment for t-shirts I ordered from Threadless for cheap. 

Eheh... ^^;

PS: I made a Twitter account exclusively for my crafts! Check out @CharmNGeekery on Twitter! =D